PennyWise Developer Guide

PennyWise is a desktop application that empowers students with the ability to make informed financial decisions, by providing a graphical analysis of their financial activities. It provides a clean Graphical User Interface (GUI) for easy comprehension of expenditure and savings.
Table of Contents
- Table of Contents
Purpose of Guide
This guide is a comprehensive resource for developing and maintaining PennyWise.
If you are an experienced developer on PennyWise, this guide provides a deep-dive into the core implementation details and design considerations of several features of the application, allowing you to quickly familiarise yourself with the inner-workings of most parts of the code architecture and design. If you are just getting started, fret not! The guide gives a quick onboarding on how you can set up and get started. Once you have the development environment up and running, head over to the design section to get a comprehensive overview of the code design of PennyWise.
If you are in the customer success team, you may find the section on requirements most helpful to you on how and why PennyWise came about. It allows you to have a thorough understanding of the product, including the user stories, use cases and non-functional requirements.
Whether you are a developer or in the customer success team, you may also find it useful to be aware of the product requirements to ensure that we are always developing the finest application and solving the right problems for students. The glossary is also helpful if you are unfamiliar with some terms used. Finally, the section on testing provides information related to how you can test the application.
How to use this Developer Guide
These are some icons you may see throughout our developer guide.
Information Box
Tip Box
![]() Tip:
This provides some quick and convenient hacks that you might find useful.
Tip:
This provides some quick and convenient hacks that you might find useful.
Danger Box
![]() Warning
Danger zone! Do pay attention to the information here carefully.
Warning
Danger zone! Do pay attention to the information here carefully.
Formatting
-
Highlightsare used to denote commands or output from the application.
If you are ready, let’s get started!
Acknowledgements
- This project is based on the AddressBook-Level3 project created by the SE-EDU initiative.
- Libraries used: JavaFX, Jackson , JUnit5
- Assets used:
- PennyWise Application Logo: Logo Generator
- Icon( s): Calendar icon from Streamline
- Font: Poppins Font from Google Fonts
- Theme: Dark Color Palette from ColorHunt
Setting up, getting started
Woohoo! We are excited to help you take your first steps in developing PennyWise. Please refer to Setting up and getting started to get up and running!
Once you are done, you may check out the design section to have a comprehensive overview of how PennyWise is designed.
Design
In this section, we provide a comprehensive and high-level overview of the code architecture and design of PennyWise, allowing you to easily familiarise yourself with navigating the various aspects of the code and to build upon the existing code base.
In explaining the design approach of the application, there are 6 main aspects:
.puml files used to create diagrams in this document can be found in
the diagrams folder. Refer to the PlantUML
Tutorial at se-edu/guides to learn how to create and edit
diagrams.
Architecture
The Architecture provides a high-level design of PennyWise and how the various components work together.

Main components of the architecture
Here, we provide a quick overview of main components and how they interact with each other.
Main has two classes
called Main
and MainApp. It
is responsible for,
- At app launch: Initializes the components in the correct sequence, and connects them up with each other.
- At shut down: Shuts down the components and invokes cleanup methods where necessary.
Commons represents a collection of classes used by multiple other components.
The rest of the App consists of four components.
-
UI: The UI of the App. -
Logic: The command executor. -
Model: Holds the data of the App in memory. -
Storage: Reads data from, and writes data to, the hard disk.
How the architecture components interact with each other
The Sequence Diagram below shows how the components interact with each other for the scenario where the user issues
the command delete 1 t/e.

Each of the four main components (also shown in the diagram above),
- defines its API in an
interfacewith the same name as the Component. - implements its functionality using a concrete
{Component Name}Managerclass (which follows the corresponding APIinterfacementioned in the previous point).
For example, the Logic component defines its API in the Logic.java interface and implements its functionality using
the LogicManager.java class which follows the Logic interface. Other components interact with a given component
through its interface rather than the concrete class (reason: to prevent outside component’s being coupled to the
implementation of a component), as illustrated in the (partial) class diagram below.

Ready to take your next steps? Read on to find out more about each of the components:
UI component
The UI component is responsible for handling the interactions on the user-interface.
The API of this component is specified
in Ui.java
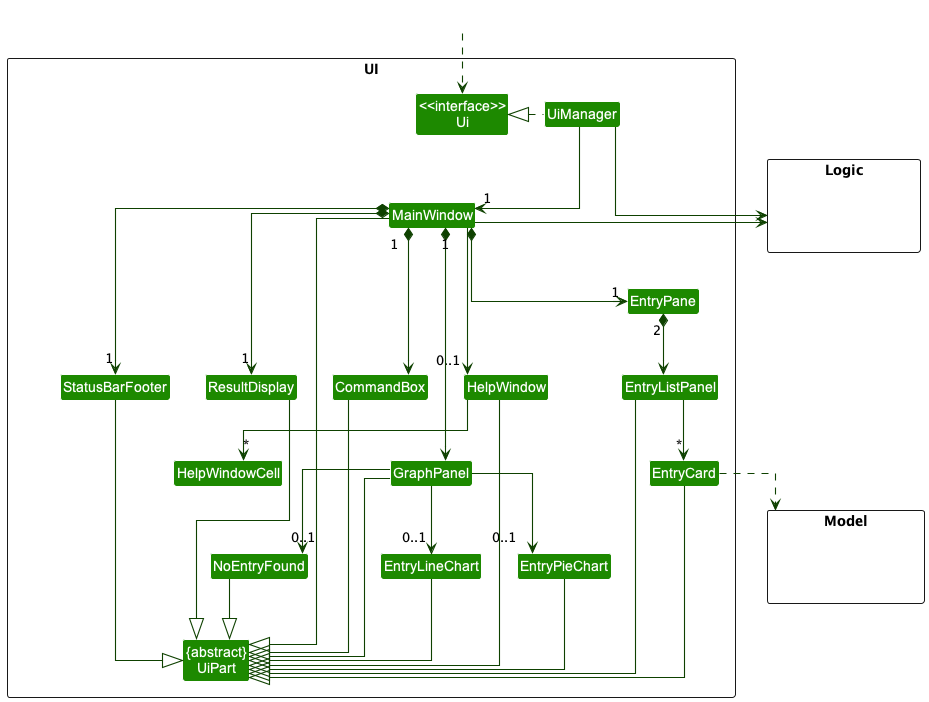
The UI consists of a MainWindow that is made up of the following parts:CommandBox, ResultDisplay, EntryPane
, StatusBarFooter, GraphPanel and HelpWindow. All these, including the MainWindow, inherit from the
abstract UiPart class which captures the commonalities between classes that represent parts of the visible GUI.
The UI component uses the JavaFx UI framework. The layout of these UI parts are defined in matching .fxml files that
are in the src/main/resources/view folder. For example, the layout of
the MainWindow
is specified
in MainWindow.fxml
The UI component,
- executes user commands using the
Logiccomponent. - listens for changes to
Modeldata so that the UI can be updated with the modified data. - keeps a reference to the
Logiccomponent, because theUIrelies on theLogicto execute commands. - depends on some classes in the
Modelcomponent, as it displaysEntryobject residing in theModel.
Logic component
The Logic component is the brain of the application and handles how commands from the users are parsed and executed.
API : Logic.java
Here’s a (partial) class diagram of the Logic component:

How the Logic component works:
- When
Logicis called upon to execute a command, it uses thePennyWiseParserclass to parse the user command. - This results in a
Commandobject (more precisely, an object of one of its subclasses e.g.AddCommand) which is executed by theLogicManager. - The command can communicate with the
Modelwhen it is executed (e.g. to add an entry). - The result of the command execution is encapsulated as a
CommandResultobject which is returned fromLogic.
The Sequence Diagram below illustrates the interactions within the Logic component for the execute("delete 1 t/e")
API call.

DeleteCommandParser should end at the destroy marker (X) but due to a limitation of PlantUML, the lifeline reaches the end of diagram.Here are the other classes in Logic (omitted from the class diagram above) that are used for parsing a user command:

How the parsing works:
- When called upon to parse a user command, the
PennyWiseParserclass creates anXYZCommandParser(XYZis a placeholder for the specific command name e.g.AddCommandParser) which uses the other classes shown above to parse the user command and create aXYZCommandobject (e.g.AddCommand) which thePennyWiseParserreturns back as aCommandobject. - All
XYZCommandParserclasses (e.g.AddCommandParser,DeleteCommandParser, …) inherit from theParserinterface so that they can be treated similarly where possible e.g. during testing.
Model component
The Model component is in charge of managing the entities in the application.
API : Model.java

The Model component,
- stores the application data i.e., all
Entryobjects (which are contained in aUniqueEntryListobject). - stores the currently ‘selected’
Entryobjects (e.g. results of a search query) as a separate filtered list which is exposed to outsiders as an unmodifiableObservableList<Entry>that can be ‘observed’ e.g. the UI can be bound to this list so that the UI automatically updates when the data in the list change. - stores a
UserPrefobject that represents the user’s preferences. This is exposed to the outside as aReadOnlyUserPrefobjects. - does not depend on any of the other three components (as the
Modelrepresents data entities of the domain, they should make sense on their own without depending on other components)
Storage component
The Storage component helps to provide data-storage facilities, allowing data in the application to be stored securely.
API : Storage.java

The Storage component,
- can save both application data and user preference data in json format, and read them back into corresponding objects.
- inherits from both
PennyWiseStorageandUserPrefStorage, which means it can be treated as either one (if only the functionality of only one is needed). - depends on some classes in the
Modelcomponent (because theStoragecomponent’s job is to save/retrieve objects that belong to theModel)
Common classes
Classes used by multiple components are in
the seedu.pennywise.commons
package.
Implementation
This section describes some noteworthy details on how certain features are implemented, as well as the considerations that goes behind the implementations. You can also find some of our proposed implementations for challenging features that we will focus on in later iterations.
Summarise Entries
The summary feature provides 3 simple statistic, including the total expenditure, total income and total balance,
helping students to have a quick overview of their expenditure and income. If the command is optionally provided with a
year and month field, the summary statistics will be contained to only the entries occurring in the specified year and
month.
How the summary command works
The summary command is implemented by the SummaryCommandParser and SummaryCommand classes.
SummaryCommandParser class is responsible for parsing the parameter received from the user.
SummaryCommand class is responsible for generating the summary statistic for the specified duration.
Below is a sequence diagram and explanation of how the summary command is executed.
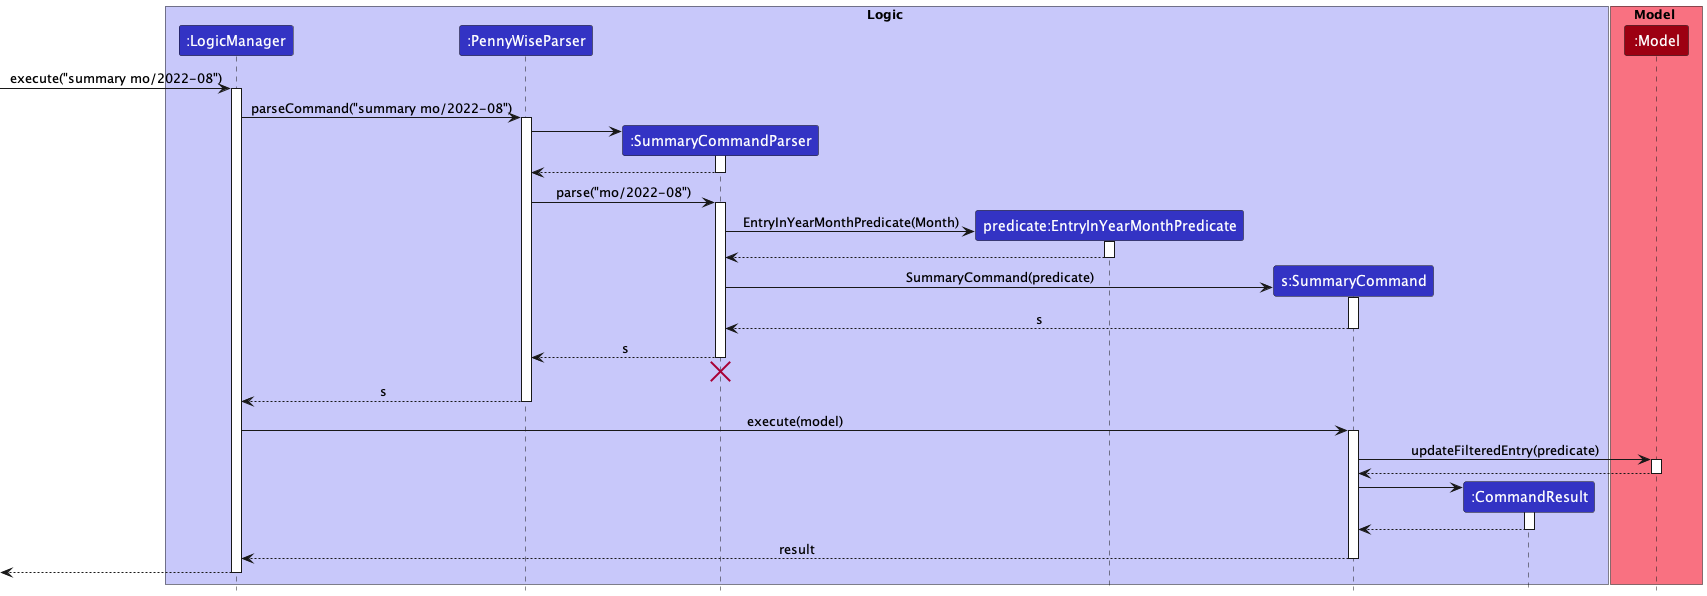
SummaryCommandParser should end at the destroy marker (X) but due to a limitation of PlantUML, the lifeline reaches the end of diagram.-
The user enters
summary mo/2022-08command in the main window -
The command is handled by
LogicManager#executemethod, which then calls thePennyWiseParser#parseCommandmethod -
The
PennyWiseParsermatches the word summary in the string and extracts the argument stringmo/2022-08 -
The
PennyWiseParserthen callsSummaryCommandParser#parsemethod and the argument string is converted to a List -
The
SummaryCommandParsercreates a newEntryInYearMonthPredicateinstance to handle the filter -
The
SummaryCommandParsercreates a newSummaryCommandinstance with theEntryInYearMonthPredicateinstance and returns it toPennyWiseParser, which in turn returns toLogicManger. -
The
LogicManagercalls theSummaryCommand#executemethod. -
The
SummaryCommandcalls theModel#updateFilteredEntrymethod and filters the income and expenditure entries by the month -
The application calculates the summary statistics for the filtered income and expenditure entries.
-
The
SummaryCommandthen creates aCommandResultand returns it toLogicManager.
Design considerations:
-
Alternative 1 (current choice): Only allow users to generate summary statistic either by month or all entries
- Pros: Easier to implement. The statistics by month is also logical as users will generally budget based on a monthly basis
- Cons: Users will not be able to customise the scope of the summary statistic further (e.g. summarising entries for the past week)
-
Alternative 2: Provide the option to specify a start and end date to generate summary statistic
- Pros: Allows more customisation to the scope of the summary statistics
- Cons: Harder to implement and the command will be more complex as it will require more parameters
Add Entry
The add command allows students to add their expenses or income entries into PennyWise.
How the add command works
The add command is implemented by the AddCommandParser and AddCommand classes.
AddCommandParser class is responsible for parsing the parameter received from the user.
AddCommand class is responsible for adding a new entry to the specified list.
Below is a sequence diagram and explanation of how the add command is executed.

AddCommandParser should end at the destroy marker (X) but due to a limitation of PlantUML, the lifeline reaches the end of diagram.-
The user enters
add t/e d/Lunch a/7.20 da/04-10-2022 c/Foodcommand in the main window. -
The command is handled by
LogicManager#executemethod, which then calls thePennyWiseParser#parseCommandmethod. -
The
PennyWiseParsermatches the entry details in the string and extracts the argument stringt/e d/Lunch a/7.20 da/04-10-2022 c/Food. -
The
PennyWiseParserthen callsAddCommandParser#parsemethod and the argument string is converted to a List. -
The
AddCommandParserthen creates a new instances of arguments needed for an Entry:EntryType,Description,Amount,Date,Category. -
The
AddCommandParseruses the new instances to create a new instance ofEntry, depending on theEntryTypespecified. -
The
AddCommandParsercreates a newAddCommandinstance with the newEntryinstance and returns it toPennyWiseParser, which in turns returns toLogicManager. -
The
LogicManagercalls theAddCommand#executemethod. -
The
AddCommandcalls theModel#addExpenditureorModel#addIncomemethod and adds the new entry to the specified list. -
The
AddCommandthen creates aCommandResultinstance and returns it toLogicManager.
Design Considerations:
-
Alternative 1 (current choice): Only allow users to create an entry with 1 type of category
- Pros: Users are able to distinctly sort their expenditures/incomes into specific pre-determined categories.
- Cons: Users would not be able to specify expenditures/incomes under their own categories.
-
Alternative 2: Allow users to specify their own categories.
- Pros: Users can be more flexible in grouping their expenditures/incomes.
- Cons: Possible dilution of categories, which would make the Pie Chart diagram not as useful.
Edit Entry
The edit command allows students to make changes to the description, date, amount or category of existing expenditure
and income entries.
How the edit command works
The edit command is implemented by the EditCommandParser and EditCommand classes.
EditCommandParser class is responsible for parsing the parameter received from the user.
EditCommand class is responsible for editing an existing entry in the application.
Below is a sequence diagram and explanation of how the EditCommand is executed.
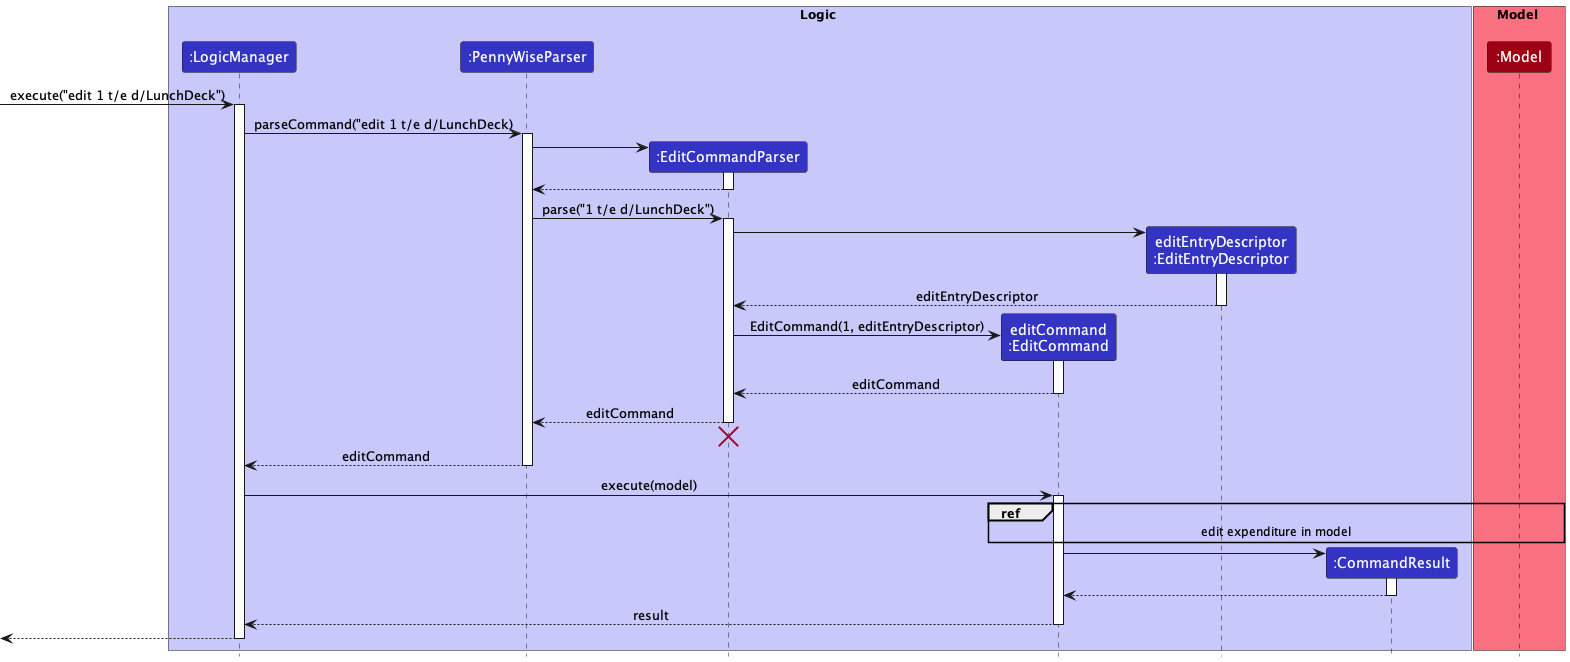
EditCommandParser should end at the destroy marker (X) but due to a limitation of PlantUML, the lifeline reaches the end of diagram.-
The user enters
edit 1 t/e d/LunchDeckcommand in the main window. -
The command is handled by
LogicManager#executemethod, which then calls thePennyWiseParser#parseCommandmethod. -
The
PennyWiseParsermatches the entry details in the string and extracts the argument string1 t/e d/LunchDeck. -
The
PennyWiseParserthen callsEditCommandParser#parsemethod and the argument string is converted to a List. -
The
EditCommandParserthen creates a new instance of theEditEntryDescriptorto describe the fields to be updated:EntryType,Description,Amount,Date,Category. -
The
EditCommandParsercreates a newEditCommandinstance with theEditEntryDescriptorinstance and returns it toPennyWiseParser, which in turns returns toLogicManager. -
The
LogicManagercalls theEditCommand#executemethod. -
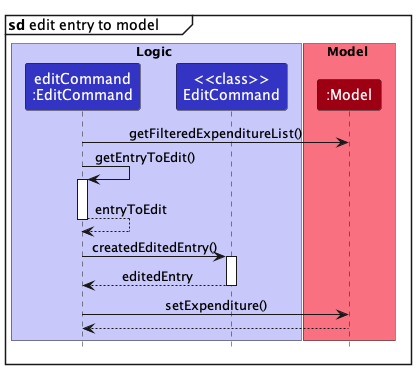
The
EditCommandcalls theModel#getFilteredExpenditureListmethod to retrieve the list of expenditure entries. -
The
EditCommandinvokes theEditCommand#getEntryToEditmethod to get the entry to be edited, then creates a new instance of the edited entry usingEditCommand#createdEditedEntry. -
The
EditCommandthen calls theModel#setExpendituremethod to update the expenditure. -
The
EditCommandeventually creates aCommandResultinstance and returns it toLogicManager.
View Pie Charts and Line Graphs
How the view command works
view t/ENTRY_TYPE [mo/MONTH]
E.g. view t/e produces a Pie Chart view of the expenses entries grouped by categories.
view t/i mo/2022-01 produces a Line Graph of the income entries in Jan 2022 grouped by days.
view command is used to filter the entry list as well as generate graphs.
The ViewCommandParser class is responsible for parsing the parameter received from the user, and passing
the EntryType
as well as GraphType to the ViewCommand class.
The ViewCommand class is responsible for filtering the entry list and generating the correct GraphConfiguration.
The class diagram below shows the structure of ViewCommand.
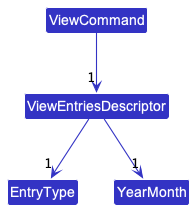
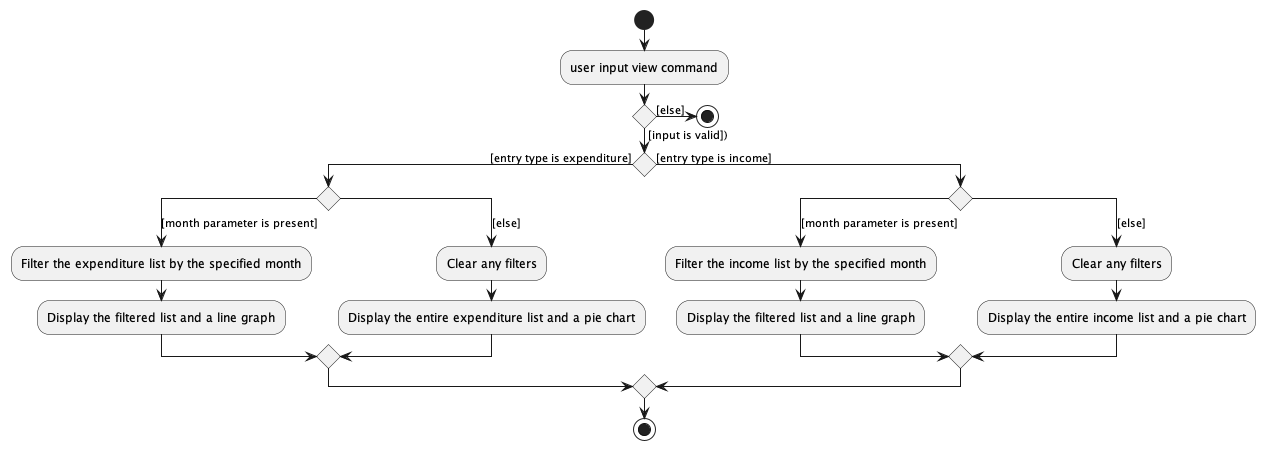
The view command will produce a category view with a Pie Chart or a daily view with a Line Graph. This is achieved
with an optional input mo/MONTH. If it is present, the entry list will be filtered by the specified month and a Line
Graph will be displayed. Otherwise, the full list will be shown and a Pie Chart will be displayed.
The activity diagram below illustrates the workflow described above when a user executes the view command.
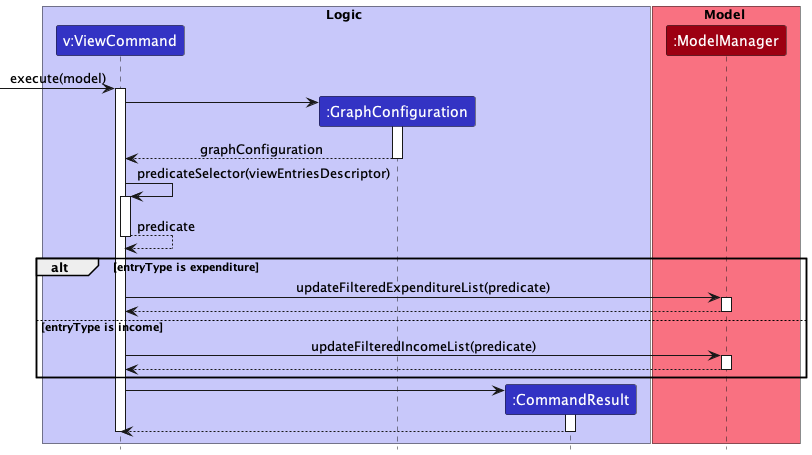
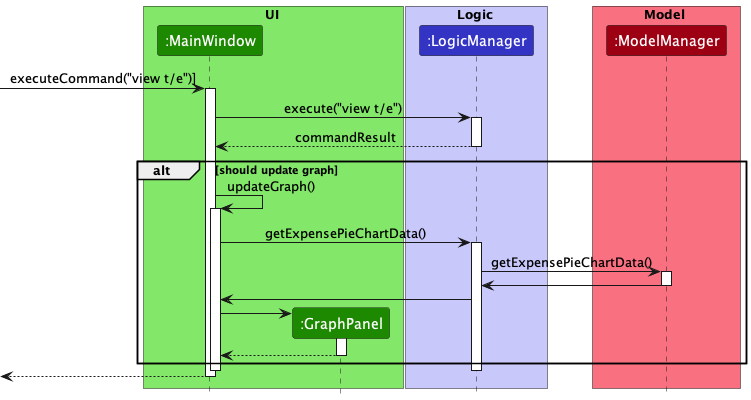
Given below is an example usage scenario and how the Pie Chart view mechanism behaves at each step. The two sequence diagrams below omit the parsing workflow as it is identical to the rest of the command. They only highlight the steps in command execution as well as UI updates.
-
The user types
view t/ecommand in the main window. -
This command is handled by
MainWindow#executeCommandmethod, which then calls theLogicManager#executemethod. -
LogicManagerthen calls thepennyWiseParser#parseCommandmethod which matches the command wordviewin the string and extracts the arguments stringt/e. -
pennyWiseParserthen calls theViewCommandParser#parsemethod. In this method, it is ensured that the input is of the correct format, and the entry type (and year month, if supplied) is extracted. It creates aviewEntriesDescriptorwithentryTypeset to expenditure andyearMonthset tonull. -
LogicManagerthen calls theViewCommand#executemethod which creates agraphConfigurationbased on theviewEntriesDescriptor. It also filters the expenditure list based onpredicategenerated from theviewEntriesDescriptor. TheCommandResult, containing thegraphConfiguration, is returned toLogicManagerand passed toMainWindow. -
MainWindowchecks thecommandResultwhich indicates a need to update graph. It then calls theupdateGraphmethod which renders the graph according to thegraphConfiguration. - In
updateGraph,LogicManager#getExpensePieChartDatacallsModelManager#getPieChartDatawhich returns thepieChartData. It then creates a newGraphPanelwith thepieChartDataand add it to the UI.
Design considerations:
-
Alternative 1: The charts update only after
viewcommand.- Pros: Easy to extend since we are adding more graph representation of data later such as bar graphs.
- Cons: Not responsive to changes in data, for instance if the user adds an entry, the Pie Chart will not be automatically updated.
-
Alternative 2: The charts update immediately after changing tabs between expenses and income.
- Pros: Intuitive, simple and quick for user.
- Cons: Difficult to extend to other graph types as user might prefer other graph representations.
The current design follows a modified version of Alternative 2. Whenever the tab is toggled manually by users, all filters will be reset and a Pie Chart will be displayed. We followed this design for the following reasons:
- The UI is still responsive to users’ tab switching action.
- Setting a filter for one list with
view t/ENTRY_TYPE mo/MONTHwould not affect the other list, because to show the other list, the user needs to either use aviewcommand, which sets a filter for the other list, or switch tab manually, which is equivalent to aview t/ENTRY_TYPEcommand.
[Proposed] Undo/redo feature
Proposed Implementation
The proposed undo/redo mechanism is facilitated by VersionedPennyWise. It extends PennyWise with an undo/redo
history, stored internally as an pennyWiseStateList and currentStatePointer. Additionally, it implements the
following operations:
-
VersionedPennyWise#commit()— Saves the current PennyWise state in its history. -
VersionedPennyWise#undo()— Restores the previous PennyWise state from its history. -
VersionedPennyWise#redo()— Restores a previously undone PennyWise state from its history.
These operations are exposed in the Model interface as Model#commitPennyWise(), Model#undoPennyWise()
and Model#redoPennyWise() respectively.
Given below is an example usage scenario and how the undo/redo mechanism behaves at each step.
- The user launches the application for the first time. The
VersionedPennyWisewill be initialized with the initial PennyWise state, and thecurrentStatePointerpointing to that single PennyWise state.

- The user executes
delete 5command to delete the 5th entry in the application. Thedeletecommand callsModel#commitPennyWise(), causing the modified state of the application after thedelete 5command executes to be saved in thepennyWiseStateList, and thecurrentStatePointeris shifted to the newly inserted PennyWise state.

- The user executes
add t/e …to add a new entry. Theaddcommand also callsModel#commitPennyWise(), causing another modified PennyWise state to be saved into thepennyWiseStateList.

Model#commitPennyWise(), so the application state will not be saved into the pennyWiseStateList.
- The user now decides that adding the entry was a mistake, and decides to undo that action by executing the
undocommand. Theundocommand will callModel#undoPennyWise(), which will shift thecurrentStatePointeronce to the left, pointing it to the previous application state, and restores the application to that state.

currentStatePointer is at index 0, pointing to the initial PennyWise state, then there are no previous PennyWise states to restore. The undo command uses Model#canUndoPennyWise() to check if this is the case. If so, it will return an error to the user rather
than attempting to perform the undo.
The following sequence diagram shows how the undo operation works:

UndoCommand should end at the destroy marker (X) but due to a limitation of PlantUML, the lifeline reaches the end of diagram.The redo command does the opposite — it calls Model#redoPennyWise(), which shifts the currentStatePointer once to
the right, pointing to the previously undone state, and restores the application to that state.
currentStatePointer is at index pennyWiseStateList.size() - 1, pointing to the latest PennyWise state, then there are no undone PennyWise states to restore. The redo command uses Model#canRedoPennyWise() to check if this is the case. If so, it will return an error to the user rather than attempting to perform the redo.

- The user executes
clear, which callsModel#commitPennyWise(). Since thecurrentStatePointeris not pointing at the end of thepennyWiseStateList, all application states after thecurrentStatePointerwill be purged. Reason: It no longer makes sense to redo theadd t/e …command. This is the behavior that most modern desktop applications follow.

The following activity diagram summarizes what happens when a user executes a new command:

Design considerations:
Aspect: How undo & redo executes:
-
Alternative 1 (current choice): Saves the entire penny wise.
- Pros: Easy to implement.
- Cons: May have performance issues in terms of memory usage.
-
Alternative 2: Individual command knows how to undo/redo by itself.
- Pros: Will use less memory (e.g. for
delete, just save the entry being deleted). - Cons: We must ensure that the implementation of each individual command are correct.
- Pros: Will use less memory (e.g. for
Documentation, logging, testing, configuration, dev-ops
Appendix: Requirements
In this section, we share some thought-process behind starting and developing PennyWise. In particular, this encompasses:
Product scope
Here, we share the target user profile and the value proposition of PennyWise, which can aid you in having a better understanding of how our features fit together a cohesive product and how it matches our target user.
Target user profile:
Tertiary students who:
- has a need to manage a significant number of expenditures or income streams
- prefer desktop apps over other types
- can type fast
- prefers typing to mouse interactions
- is reasonably comfortable using CLI apps
Value proposition:
PennyWise empowers tertiary students with the ability to make informed financial decisions by providing a graphical analysis of their financial activities. This allows students to easily identify categories they are overspending on and spot trends in their spending patterns, allowing them to zone in on which aspect to cut down on. Furthermore, PennyWise also helps students to keep track of their income streams, making it fast and convenient for them to juggle their budget.
User stories
Here, we list some user stories of the application so that you can better understand how the application can be used from the user’s perspective.
Priorities:
- High (must have) -
HIGH - Medium (nice to have) -
MEDIUM - Low (unlikely to have) -
LOW
| Priority | As a… | I want to… | So that I can… |
|---|---|---|---|
HIGH |
student | add a new expense/income entry | keep track of the details of my expenditures/incomes |
HIGH |
student | delete an existing expense/income entry | remove an expense/income entry that I do not need to track |
HIGH |
student | view all my expenses/income | get an overview of all my expenses/income |
HIGH |
student | summarize my expenses/income | easily decide on how to adjust my spending |
MEDIUM |
student | edit any mistakes in my expenses/income entries | correctly log my budgeting |
MEDIUM |
student who spends a lot | determine areas where I am spending the most on | zone in on the appropriate areas to cut down my spending |
MEDIUM |
student who spends a lot | categorize my expense entries | have a finer overview of my expense entries |
MEDIUM |
student with multiple income streams | categorize my income entries | have a finer overview of my income entries |
MEDIUM |
organised student | filter my expenses by tags | have an overview of the areas where I spent |
MEDIUM |
organised student | filter my incomes by tags | have an overview of the areas where I am earning |
MEDIUM |
organised student | filter my expenses by date range | identify trends and patterns in my spending habits |
MEDIUM |
organised student | filter my incomes by date range | identify trends and patterns in my income streams |
MEDIUM |
potential user | see example data in the application | see how the application works |
LOW |
visual learner | view my expenses/income using different types of graphs | better visualisation of my spending/income patterns and habits |
LOW |
forgetful student | view a list of commands and how to use them | refer to it when I forget the commands |
LOW |
forgetful student | have a list of prompts for commands when I am typing | avoid having to constantly refer to the user guide |
Use cases
Here, we list some use cases of the application.
PennyWise and the Actor is the User, unless specified
otherwise, for all Entries, they can only be of type expenditure or income.
Use case: UC1 - Add an entry
MSS
- User requests to add an entry
- PennyWise adds the entry to the specified list
-
PennyWise shows updated list with new entry added
Use case ends.
Extensions
-
1a. The given command has an invalid syntax.
-
1a1. PennyWise shows an error message.
Use case resumes at step 1.
-
Use case: UC2 - Delete an entry
MSS
- User requests to list entries
- PennyWise shows requested list of entries
- User requests to delete a specific entry in the list
- PennyWise deletes the entry
-
PennyWise shows updated list
Use case ends.
Extensions
-
2a. The list is empty.
Use case ends.
-
3a. The given command has an invalid syntax.
-
3a1. PennyWise shows an error message.
Use case resumes at step 1.
-
Use case: UC3 - Edit an entry
MSS
- User requests to list entries
- PennyWise shows requested list of entries
- User requests to edit a specific entry in the list
- PennyWise edits the entry
-
PennyWise shows updated list
Use case ends.
Extensions
-
2a. The list is empty.
Use case ends.
-
3a. The given command has an invalid syntax.
-
3a1. PennyWise shows an error message.
Use case resumes at step 1.
-
Use case: UC4 - Summarizing statistics
MSS
- User requests for a summary
-
PennyWise shows calculated summary of entries
Use case ends.
Use case: UC5 - Clearing the application
MSS
- User requests to clear entries in PennyWise
-
PennyWise clears all entries from both lists
Use case ends.
Use case: UC6 - Exiting the application
MSS
- User requests to exit the application
-
PennyWise exits
Use case ends.
Use case: UC7 - View help
MSS
- User requests to view help
-
PennyWise displays a pop-up window with a link to the user guide
Use case ends.
Non-Functional Requirements
-
Technical requirements: The system should work on any mainstream OS as long as it has Java
11or above installed. - Performance requirements: The system should be able to hold up to 1000 expenses entries and 1000 income entries without a noticeable sluggishness in performance for typical usage.
- Performance requirements: The system should respond within two seconds.
- Quality requirements: A user with above average typing speed for regular English text (i.e. not code, not system admin commands) should be able to accomplish most of the tasks faster using commands than using the mouse.
- Quality requirements: The system should be easily usable by a novice who has never managed budgeting without having to constantly refer to the user guide.
- Data Requirements: Data should be persisted within the user’s file system only.
- Documentation: The User Guide should be directed towards self-help for users, so that they are able to understand how to use the application and recover from mistakes.
- The user interface should be self-explanatory as much as possible for users who are not IT-savvy without having to constantly refer to the user guide.
- The source code should be open source.
- The product is offered as a free online service.
Glossary
In the Glossary, we provide our definitions for some commonly-used terms that you can find throughout the application.
| Term | Definition |
|---|---|
| Mainstream OS | Windows, Linux, Unix, macOS |
| Entry | An entry refers to either an expenditure or income |
| Field | Represents the Description, Amount, Date, Category and Type of an entry in the application. |
| Identifier | The field code that are entered during user input, so that PennyWise knows what your inputs are e.g. t/, d/, a/, da/ c/. |
| JSON File | JavaScript Object Notation File. Data interchange format file that uses human-readable text to store and transmit data objects consisting of attribute–value pairs. |
| Graphical User Interface (GUI) | The graphical user interface is a form of user interface that allows users to interact with electronic devices through graphical icons. |
Appendix: Instructions for manual testing
Given below are instructions to test the app manually.
Launch and shutdown
-
Initial launch
-
Download the jar file and copy into an empty folder
-
Double-click the jar file Expected: Shows the GUI with a set of sample data. The window size may not be optimum.
-
-
Saving window preferences
-
Resize the window to an optimum size. Move the window to a different location. Close the window.
-
Re-launch the app by double-clicking the jar file.
Expected: The most recent window size and location is retained.
-
Adding an entry
-
Adding an entry while all entries are being shown
-
Prerequisites: None
-
Test case:
add t/e d/Lunch a/7.20 da/04-10-2022 c/Food
Expected: Entry is added to the expenditure list. Details of the added entry shown in the status message. -
Test case:
add t/e d/Lunch a/$7.20 da/04-10-2022 c/Food ...
Expected: No entry is added. Error details shown in the status message on amount formatted to 2 decimal places. -
Test case:
add d/Lunch a/7.20 da/04-10-2022 c/Food
Expected: No entry is added. Error details shown in the status message. -
Other incorrect add commands to try:
add,add da/15-Feb-2022,add x,...(where x a string that does not follow the command format)
Expected: Similar to previous.
-
Deleting an entry
-
Deleting an entry while all entries are being shown
-
Prerequisites: At least 1 entry in the specified list.
-
Test case:
delete 1 t/e
Expected: First expenditure entry is deleted from the list. Details of the deleted entry shown in the status message. Timestamp in the status bar is updated. -
Test case:
delete 0 t/e
Expected: No entry is deleted. Error details shown in the status message. Status bar remains the same. -
Other incorrect delete commands to try:
delete,delete x t/e,...(where x is larger than the list size),delete 1 y(where y is a string that does not follow the command format)
Expected: Similar to previous.
-
Editing an entry
-
Editing an entry while all entries are being shown
-
Prerequisites: At least 1 entry in the specified list.
-
Test case:
edit 1 t/e d/Edited Description
Expected: First expenditure entry is edited from the list. Details of the edited entry shown in the status message. -
Test case:
edit 0 t/e d/Edited Description
Expected: No entry is edited. Error details shown in the status message. -
Other incorrect edit commands to try:
edit,edit x t/e,...(where x is larger than the list size),edit 1 y(where y is a string that does not follow the command format)
Expected: Similar to previous.
-
View
-
Viewing the Pie Chart for a list of entry
-
Prerequisites: At least 1 entry in the specified list.
-
Test case:
view t/e
Expected: Expense tab displays all expenditure entries. Updated Pie Chart of expenditures is displayed. Success details shown in the status message. -
Test case:
view t/x
Expected: Old Diagram remains shown. Error details shown in the status message. -
Other incorrect view commands to try:
view,view x,...(where x is a string that does not follow the command format)
-
-
Viewing the Line Graph for a list of entry for a certain month
- Prerequisites: At least 1 entry in the specified list for the specified month.
-
Test case:
view t/e mo/2022-03
Expected: Expense tab displays expenditure entries filtered by the specified month. Updated Line Graph of expenditures is displayed. Success details shown in the status message. -
Test case:
view t/e mo/2022
Expected: Old Diagram remains shown. Error details shown in the status message, indicating invalid month format. - Other incorrect view commands to try:
view,view x,...(where x is a string that does not follow the command format)
Expected: Similar to previous.
Summary statistics
-
Viewing the Pie Chart for a list of entry
-
Prerequisites: Multiple entries in expenditure and income lists.
-
Test case:
summary
Expected: Status message shows the total expenditure, total income and total balance. -
Test case:
summary da/01-10-2022
Expected: Status message shows the total expenditure, total income and total balance for the 01-10-2022 -
Other correct summary commands to try:
summary da/x,...(where x is a string that follows the date format)
Expected: Similar to previous, but for the specific datex. -
Other incorrect summary commands to try:
summary x,...(where x is a string that does not follow the command format)
Expected: Error details shown in the status message.
-
Appendix: Effort
In this section, we will give an overview of the overall challenges faced as well as the achievements of the project, in order to provide a glimpse of how much effort that we have put in.
In general, PennyWise was not an easy application to develop. We have spent much time tailoring our product requirements, value proposition, user stories and use cases, before implementing all the features that we have planned out, as well as some nice-to-have features. Furthermore, there have been a great amount of work in writing test cases, enabling us to achieve a code coverage of close to 70%.
Challenges Faced
Models
In AddressBook Level-3, there was only 1 Person class, which made it
straightforward to define fields and actions associated with a Person. However, in PennyWise, we have both an Income
class and an Expense
class. Thus, all instances of AddressBook and its related entities had to be removed and refactored throughout the
project. Furthermore, we needed to take great care in implementing an Entry class, which acts as a parent of
the Income and Expense
class so that we can take advantage of polymorphism and improve code reusability.
Commands
While many of the commands use the same syntactical structure as
in AddressBook Level-3, we have augmented the capabilities of several
commands. For instance, the list command in AddressBook Level-3
was used to update the list of persons shown in the Address Book. However, we have augmented it as a view command,
which not only allow students to view the list of expense or income entries in the application, but at the same time,
updates the corresponding graph displayed to the student, providing an instant visualisation of their expense or income
entries. This required us to take great care in managing the state of the application, ensuring a single source of truth
that is consistent for data on the list panel or graph panel.
UI
In comparison to AddressBook Level-3, PennyWise integrates the JavaFX Charts package to create Line Graph and Pie Chart in the application from scratch. In order to do so, we have faced multiple challenges in ensuring that the charts were responsive and colour-themed with the application. Furthermore, we also had to tackle aspects regarding customising the axis labels and chart legends, which required much time.
In addition, PennyWise features a unique tab-based layout which differs from AddressBook Level-3’s single layout format. Using a tab-based layout required us to put in more thought on how and what data to render based on the tab that is visible. Furthermore, it required us to manipulate the tab toggling for certain commands. Nevertheless, we believe that adding a tab-based layout is a great addition to provide a modern touch to the application, and helps to make full use of the screen real-estate.
Finally, implementing and styling the UI was not easy. PennyWise’s UI is responsive and respects a unified colour theme and consistent font family. This helps to provide a standardised and modern look-and-feel to the application. Many rounds of iterations went into designing PennyWise, requiring us to overhaul the existing CSS file in AddressBook Level-3.
Achievements of the Project
We are happy that we have managed to overcome the technicalities and challenges of the project. Even though the process was a bumpy one, we achieved the features that we have set out for ourselves and wrote extensive tests to improve code coverage. This was reflected in the ease of testability and low bug count in PE-D.
All in all, it has been a wonderful learning experience for all of us!